
-
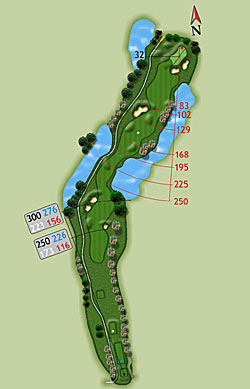
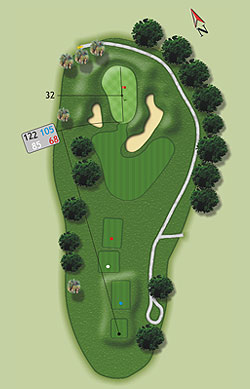
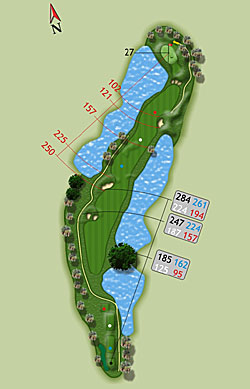
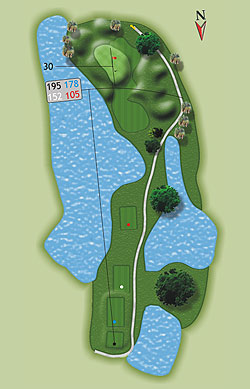
Hole #1
Pro Tips
Warm ups should have taken place on the range for this demanding par five.
Your tee shot should be placed far enough to the left side of the fairway to view the remaining hazards that await you.
The second shot is a positioning tool to allow for your favorite yardage to the green.
This small elevated green will require a high soft approach that must carry to the green or will be rejected back into the rough or greenside bunker.
-
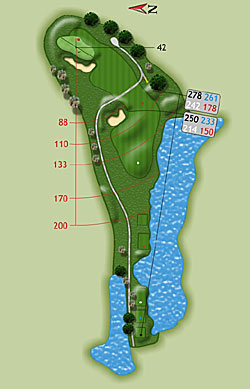
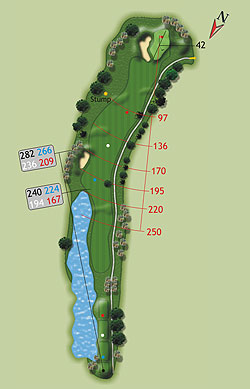
Hole #2
Pro Tips
The right side of the fairway will give the best look into this shortish par 4.
Carrying the hazard on the right is the main concern off the tee.
Positioning your approach short of the pin will yield the best possibility of getting an uphill putt for a chance of bettering par.
-
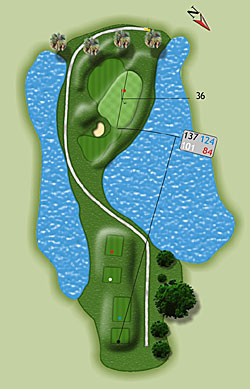
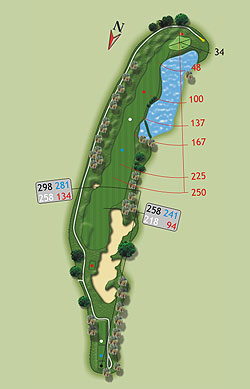
Hole #3
Pro Tips
Difficult and beautiful from every tee and usually against the wind.
This par three is almost all carry over water and the best position is on the right side of this enormous rolling green.
-
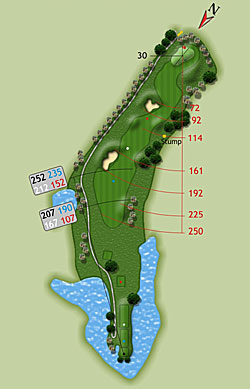
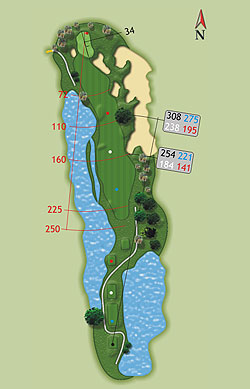
Hole #4
Pro Tips
This true par four delivers as the yardage indicates a long demanding battle tee to green.
Your tee shot should be positioned in the fairway to have a chance at hitting this green in regulation.
-

Hole #5
Pro Tips
This is the easiest par five on the course. Straight away tee to green this sets up as the one a long hitter can attempt to reach in two.
Avoiding the well placed bunker on the right will afford the best opportunity to have a go at this difficult green.
If hitting this in two is not an option, accuracy is a must for your third shot to this narrow uphill target green.
-
Hole #6
Pro Tips
Take advantage of the shortest par three on the course.
This hole is short and beautiful unless your iron shot misses long or left.
Then a soft lob shot is required to have any chance of making par.
-
Hole #7
Pro Tips
This straight away par four is not as easy as the yardage indicates.
Large bunkers guard the fairway to eliminate any advantage a big hitter may have in carrying it inside of the 100 yards marker.
After negotiating your tee shot away from those large bunkers, this small uphill green falls away on either side, and water is just a few steps off the left side.
-
Hole #8
Pro Tips
The eighth hole is a tricky par four. A large bunker guards the entire right side of the landing area and it is a must to avoid.
After landing your tee shot on the left side of the fairway, your next shot must carry over water to have an opportunity for par.
-
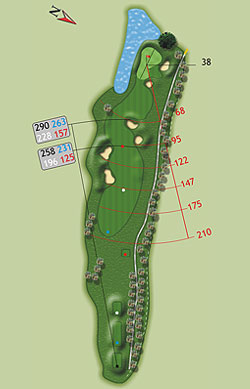
Hole #9
Pro Tips
If eight was a problem there is no let up on this 230 yard par three from the back tee to an uphill narrow green.
Short is your best option regarding a missed hit as the bunkering and rough that guards this hole make recovery difficult.
-
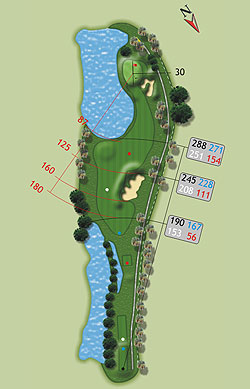
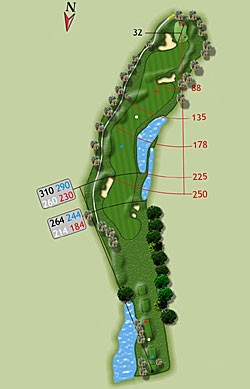
Hole #10
Pro Tips
If holes were related this would be our #1 hole’s older brother.
This winding par five is bordered by water off the tee and follows you ever so closely as you make your way down this medium length par 5.
Bunkers are placed at every landing area through your journey leading up to a small elevated green.
-
Hole #11
Pro Tips
Demanding par fours don’t get any better than this one. Water guards the tee shot landing area on left of this slight right bending par four.
Avoiding out of bounds to the right, and setting up on the left side of the fairway is your best chance of managing this long par four.
Your approach to the green will probably leave you with an uphill putt, since this green slopes front to back..
-
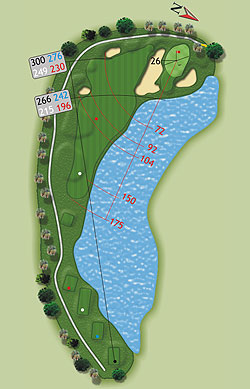
Hole #12
Pro Tips
This beautiful par 5 requires two well positioned shots to set up a chance at going at the pin on your approach.
Avoiding the 100 yard sand waste area on the right will make your lay up easier since water guards the right side of this hole leading up to the green.
Hitting this in two is not an option for most players and great care must be taken to lay back a safe distance from the green as your landing area narrows the closer your ball travels toward the green.
-
Hole #13
Pro Tips
Water left and down the entire side makes accuracy a premium on this medium length par four.
A well placed tee shot should land on the right side of the fairway giving the player their best opportunity to attack this elevated well guarded green.
-
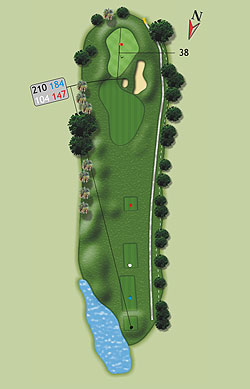
Hole #14
Pro Tips
Demanding and long, this par three offers quite a challenge into the prevailing South Florida breeze. A long carry over water makes the right side of the green your safest and best play.
The safest play would be to the right side of the green.
Be careful not to bail out too far to the right as your chip shot will be difficult to hold as the green slants away towards the water.
-
Hole #15
Pro Tips
We saved the best par five for last. This long uphill beauty is surrounded by natural wetlands and bunkers providing a spectacular natural setting.
It is best to position your tee shot left center allowing for a full view to the remaining yardage. Second shots should be positioned as far left as possible to avoid a large bunker that guards the second shot landing area.
As the elevation rises some 15 feet to the putting surface this well guarded green slopes dramatically from back to front. Birdies are rarity on this last par five.
-
Hole #16
Pro Tips
The player can see the whole picture from this tee that overlooks one of our largest lakes on the property.
Drive it as far down the fairway as you dare on this sliding par four. For the extremely long hitter a 300 yard shot will allow for an eagle put, but a 280 yard shot could get you wet.
If you need a birdie this hole awaits for the straight hitter.
-
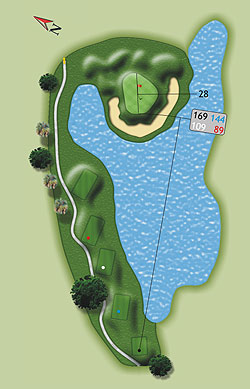
Hole #17
Pro Tips
Our signature hole, and our most demanding par three, is just waiting to take a shot back from your score.
This hole has five teeing areas for maximum enjoyment in all kinds of conditions.
Your tee shot is over water, into a sloping green, surrounded by a horseshoe bunker.
-

Hole #18
Pro Tips
This straight forward par four allows for aggressive play as you make your last effort at posting a good number.
Long hitters can let go since this fairway is almost forty five yards wide.
A smallish green awaits a well placed iron shot for a last chance at making a par.